The many languages available for working with the .NET Framework make it easy to develop code that validates data entered by a user before sending it to a database table. In addition, ASP.NET provides numerous validation controls that make it easy to validate data entered via a Web Form.
Though your .NET development toolbox is well-stocked, these tools are useless if you use them ineffectively. Be aware of what type of data checks you need to perform to ensure data integrity. The following list outlines how you should approach data validation:
Required: One of the most basic validation methods is defining certain fields as required, so that users must enter something in the field before they can save the data. Likewise, database tables may contain required columns—passing null data to these columns will raise an exception.
Data type: Another obvious way to validate user input is checking the data type against what is expected. For example, a date field should only accept legal dates (although there are numerous format options). Trying to pass an invalid date value to a database date column will trigger an exception.
Length: The length of a date entry field is one of the most common validation errors that I encounter. You must adhere to the size limit defined in the database or data store to ensure an exception isn't raised. This is easy in both ASP.NET Web and Windows Forms by using a field's MaxLength property or attribute. You should also validate the data length in the code since Web Forms may be bypassed by passing data to the server via HTTP Server variables.
Format: A field's type can determine its proper format. A good example is a date field that may use the xx/xx/xxxx format. Likewise, telephone number and salary fields utilize specific formats. You may create a custom field control, utilize JavaScript in ASP.NET, or apply formatting via code and the String.Format method or using regular expressions to apply necessary formatting to user data. This may be part of data validation, and the validation shouldn't accept improperly formatted data.
Range of values: Utilizing a range of values as a guide for data entry allows you to easily check if an entered value falls within it. This type of check may be used for entering salaries, zip codes, and so forth.
Check against another field value: You may validate a field's value against another field on the form. The second field could be hidden or entered by the user. One common example is date entries where a user may enter start and end dates, and the end date should always be greater than or equal to the start date.
Putting this list in action depends on the application type. We'll examine an example using the ASP.NET platform. The sample Web Form has four fields:
Username: Required text field limited to 50 characters. A RequiredFieldValidator control is used to ensure a value is entered.
Zip code: Text field accepting a five character zip code in the integer range of 00000 and 99999. It's not required, so validation is performed only if a value is entered. A RegularExpressionValidator control is used to ensure only five numeric digits are entered. A RangeValidator control verifies the value is in the legal range.
Start date: Text field accepting a date value. A RequiredFieldValidator control is used to make sure a value is entered. A CompareValidator control is used to ensure only a date type of date is entered, and another CompareValidator control is used to verify the start date is less than the end date.
End date: Text field accepting a date value. A RequiredFieldValidator control is used to make sure a value is entered. A CompareValidator control is used to make sure a date is entered in the field, and another CompareValidator control verifies the end date is greater than the start date.

Sunday, December 6, 2009
Monday, November 30, 2009
Calling an ASP.Net Web Service from Javascript
Page which calls the service has to have Script Manager and the Script Manager has to mention the ServiceReference attribute.
ScriptManagers>
Also, the Web.config file should have an extra entry for ScriptHandlerFactory.
Below is my JavaScript method which calls the WebService. This has got a SuccessCallBack method to which the Service returns the result set.
var DivIDAct;
function MyWebServiceCallForActuals(ActualsDivId, BudgetYear, BudgetVersion, SalesDivision, row, Display)
{
expandcollapse(ActualsDivId, row, 2);
BrandSerivces.GetBrandsForActuals(BudgetYear, BudgetVersion, SalesDivision, '', SuccessCallBackActuals);
ActualsDivId = 'Division' + ActualsDivId;
var ActualsDivObj = document.getElementById(ActualsDivId);
DivIDAct = ActualsDivObj;
}
function SuccessCallBackActuals(result)
{
DivIDAct.innerHTML = result;
}
This is just to show an Expand Collapse button on click of each row item. A new row item would be displayed under the clicked row, which will show the details of the current row. The Javascript ExpandCollapse method takes care about swaping the Expand(Plus Image) and Collapse(Minus image) images. I am not going to explain much about this as this is self explanatory, just walk through the code.
function expandcollapse(obj, row, ch) {
var div;
var img;
if (ch == 1) {
div = document.getElementById('Div' + obj);
img = document.getElementById('img' + obj);
} else if (ch == 2) {
div = document.getElementById('Division' + obj);
img = document.getElementById('imgActuals' + obj);
}
if (div.style.display == "none") {
div.style.display = "block";
if (row == 'alt') {
img.src = "../App_Themes/Two/images/minus.gif";
}
else {
img.src = "../App_Themes/Two/images/minus.gif";
}
img.alt = "Close to view other Details";
}
else {
div.style.display = "none";
if (row == 'alt') {
img.src = "../App_Themes/Two/images/plus.gif";
}
else {
img.src = "../App_Themes/Two/images/plus.gif";
}
img.alt = "Expand to show Details";
}
}
Make a Dynamic Javascript Function Call from the ASP.Net Gridview Template fields.

Keep an Empty Div in a new Template Field where the Web Service result set (This result set would be returned by the SuccessCallBack method of javascript.) would be displayed. A detailed table for the corresponding row item.
<>
<div id="Division" style="overflow: auto; width: 100%">div>
Thursday, November 26, 2009
Calculating Percentage(%) in the ASP.Net Grid View Footer
Yet another scenario, calculating the percentage based on an common property. Say your Stored Procedure returns the ales and Expenses data pinned together, ORDER BY a particular field. Have a look at the below Grid view control. My stored procedure was returning only the Planned-Sales and Planned Expenses for each Division, for each year. M1, M2 M3...M12 represents the Months. 

The data which the Stored Procedure returns will be a repeated with Planned-Sales, Planned-Expense for each Sales Division.
Bind your ASP>Net grid view control with data. Rest to be taken care at the Row Data Bound Event of the grid view control.
private void BindMainGrid()
{
string vBdgYear = "2010";
string vSalesDivision = "1";
string vYtdOrMtd = "YTD";
if (DrpBudgetYear.SelectedValue == "0")
{ vBdgYear = null; }
else { vBdgYear = DrpBudgetYear.SelectedValue; }
List oEntity = new List();
DashboardAnalyticsLogic oLogic = new DashboardAnalyticsLogic();
oEntity = oLogic.DashboardAnalytics(vBdgYear, vSalesDivision, vYtdOrMtd);
if (oEntity.Count != 0)
{
GrvMain.DataSource = oEntity;
GrvMain.DataBind();
}
else
{
LblMsg.Text = "No Record found";
}
}
Declare some public variables to calculate the percentage of Expenses against Sales. Go through the code snippet below, First IF condition checks for each data row, you can access each cell item values here with its index mentioned. Obviously, you would be knowing the number of coulmns of the grid view after bind. (I didnt get a chance where the same to be done with dynamicall colum growing grid ) . The second IF finds the footer row and puts data into each cells after the calculation, which would be available from the public variable.
See, first IF condition takes you in when it is a data row with data. (Header row and Footer rows cant get into this loop.)
System.Int64 TotalM1, TotalM2, TotalM3, TotalM4, TotalM5, TotalM6;
protected void GrvMain_RowDataBound(object sender, GridViewRowEventArgs e)
{
if (e.Row.RowType == DataControlRowType.DataRow)
{
if (TotalM1 == 0) { TotalM1 = Convert.ToInt64(DataBinder.Eval(e.Row.DataItem, "M1")); }
else { TotalM1 = (Convert.ToInt64(DataBinder.Eval(e.Row.DataItem, "M1")) * 100) / TotalM1; }
if (TotalM2 == 0) { TotalM2 = Convert.ToInt64(DataBinder.Eval(e.Row.DataItem, "M2")); }
else { TotalM2 = (Convert.ToInt64(DataBinder.Eval(e.Row.DataItem, "M2")) * 100) / TotalM2; }
if (TotalM3 == 0) { TotalM3 = Convert.ToInt64(DataBinder.Eval(e.Row.DataItem, "M3")); }
else { TotalM3 = (Convert.ToInt64(DataBinder.Eval(e.Row.DataItem, "M3")) * 100) / TotalM3; }
if (TotalM4 == 0) { TotalM4 = Convert.ToInt64(DataBinder.Eval(e.Row.DataItem, "M4")); }
else { TotalM4 = (Convert.ToInt64(DataBinder.Eval(e.Row.DataItem, "M4")) * 100) / TotalM4; }
if (TotalM5 == 0) { TotalM5 = Convert.ToInt64(DataBinder.Eval(e.Row.DataItem, "M5")); }
else { TotalM5 = (Convert.ToInt64(DataBinder.Eval(e.Row.DataItem, "M5")) * 100) / TotalM5; }
if (TotalM6 == 0) { TotalM6 = Convert.ToInt64(DataBinder.Eval(e.Row.DataItem, "M6")); }
else { TotalM6 = (Convert.ToInt64(DataBinder.Eval(e.Row.DataItem, "M6")) * 100) / TotalM6; }
}
else if (e.Row.RowType == DataControlRowType.Footer)
{
e.Row.Cells[0].Text = "Percentage";
e.Row.Cells[4].Text = Convert.ToString(TotalM1) + "%";
e.Row.Cells[5].Text = Convert.ToString(TotalM2) + "%";
e.Row.Cells[6].Text = Convert.ToString(TotalM3) + "%";
e.Row.Cells[7].Text = Convert.ToString(TotalM4) + "%";
e.Row.Cells[8].Text = Convert.ToString(TotalM5) + "%";
e.Row.Cells[9].Text = Convert.ToString(TotalM6) + "%";
e.Row.Cells[1].HorizontalAlign = e.Row.Cells[2].HorizontalAlign = HorizontalAlign.Right;
e.Row.Font.Bold = true;
e.Row.Height = 28;
}
Let me tell you what i did in the Row Data Bound. You agree that the public variables would have value zero at the first time check from the IF condition? If
Sunday, November 22, 2009
The Template Persistent Cache initialization & IIS Application Pool
A quite funny monday morning. Our network police, Mr.Pais rushed to the desk with his lappy and wooed, finding a strange issue with IIS application pool. Obvious, he wont stay cool until and unless finds a solution. The brainstomer had given a glimspe of the error message the Event Viewer had been throwing for the last whole week. He observed the issue was registering in the log every morning before the office hour starts. Here is the event viewr log.
Event Type: Error
Event Source: Active Server Pages
Event Category: None
Event ID: 5
Date: 14/05/2004
Time: 4:32:55 AM
User: N/A
Computer: 001DC001
Description:
Error: The Template Persistent Cache initialization failed for Application Pool 'DefaultAppPool' because of the following error: Could not create a Disk Cache Sub-directory for the Application Pool. The data may have additional error codes..
Googleoscoped the solution, suggested him the workaround.
A. Add the NT AUTHORITY\NETWORK SERVICE account to
C:\WINDOWS\Help\iisHelp\common with "Read and Execute," "List Folder Contents" and "Read".
C:\WINDOWS\Help\iisHelp\common with "Read and Execute," "List Folder Contents" and "Read".
B. Add the NT AUTHORITY\NETWORK SERVICE account to
C:\WINDOWS\system32\inetsrv\ASP Compiled Templates with Full Control.
C:\WINDOWS\system32\inetsrv\ASP Compiled Templates with Full Control.
C. Add the NT AUTHORITY\NETWORK SERVICE account to
C:\WINDOWS\IIS Temporary Compressed Files with Full Control.
C:\WINDOWS\IIS Temporary Compressed Files with Full Control.
Do an IIS Reset.
You know what, he never turned up saying the same. Issue must be solved. ;)
Tuesday, November 17, 2009
Using Temporary Table, SQL Server 2005
ALTER PROCEDURE dbo.BUDGET_COMMITMENT_QTY_REPORT
(
@BudgetYear NVARCHAR(50) = null,
@BudgetVersion NVARCHAR(50) = null,
@Company NVARCHAR(50) = null,
@Division NVARCHAR(50) = null,
@CostCenter NVARCHAR(50) = null,
@SubAccount NVARCHAR(50) = null,
@SalesDivision NVARCHAR(50) = null,
@AsOnDate DATETIME = null
)
AS
SET NOCOUNT ON
BEGIN
DECLARE @Select NVARCHAR(4000)
DECLARE @Param NVARCHAR(4000)
SET @Param = ' @BudgetYear NVARCHAR(50) = null,
@BudgetVersion NVARCHAR(50) = null,
@Company NVARCHAR(50) = null,
@Division NVARCHAR(50) = null,
@CostCenter NVARCHAR(50) = null,
@SubAccount NVARCHAR(50) = null,
@SalesDivision NVARCHAR(50) = null,
@AsOnDate DATETIME = null '
CREATE TABLE #TEMPTABLE
(
BudgetType NVARCHAR(50), BudgetYear NVARCHAR(50), Company NVARCHAR(50), Division NVARCHAR(50), SalesDivision NVARCHAR(50), Costcenter NVARCHAR(50), SubAccount NVARCHAR(50), Display NVARCHAR(50), Amount DECIMAL(29,2), Quantity DECIMAL(29,2), RQDate DateTime
)
INSERT INTO #TEMPTABLE
SELECT BUDGET_TYPE AS BudgetType, BUDGET_YEAR AS year, COMPANY_CODE AS Company, DIVISION_CODE AS Division,
SALES_DIVISION AS SalesDivision, COST_CENTER AS costCenter, SUB_ACCOUNT_CODE AS subAccount, 'Precommitment' AS Display, SUM(AMOUNT)
AS TotalValue, SUM(QUANTITY) AS Quantity, PR_REQ_DATE AS RQDate
FROM ECMS_PR_BUDGET_CHECK
GROUP BY BUDGET_TYPE, BUDGET_YEAR, COMPANY_CODE, SALES_DIVISION, COST_CENTER, SUB_ACCOUNT_CODE, QUANTITY, DIVISION_CODE,
PR_REQ_DATE
UNION ALL
SELECT BUDGET_TYPE AS BudgetType, BUDGET_YEAR AS BudgetYear, COMPANY_CODE AS Company, DIVISION_CODE AS Division,
SALES_DIVISION AS SalesDivision, COST_CENTER AS CostCenter, SUB_ACCOUNT_CODE AS SubAccount, 'Commitment' AS Display, SUM(AMOUNT)
AS TotalValue, SUM(QUANTITY) AS Quantity, PO_REQ_DATE AS RQDate
FROM ECMS_PO_BUDGET_CHECK
GROUP BY BUDGET_TYPE, BUDGET_YEAR, COMPANY_CODE, SALES_DIVISION, COST_CENTER, SUB_ACCOUNT_CODE, DIVISION_CODE, PO_REQ_DATE
--SELECT * FROM #TEMPTABLE
SET @Select = 'SELECT #TEMPTABLE.BudgetYear, #TEMPTABLE.Display, #TEMPTABLE.Amount,
#TEMPTABLE.Quantity, ECMS_MST_COMPANY.Company_Name, ECMS_MST_COST_CENTER.Cost_center_desc,
ECMS_MST_SUB_ACCOUNT.SUB_AC_NAME, ECMS_MST_SALES_DIVISION.SALES_DIVISION_NAME , ECMS_MST_DIVISION.DIVISION_NAME
FROM #TEMPTABLE
INNER JOIN
ECMS_MST_BUDGET_TYPE ON #TEMPTABLE.BudgetType = ECMS_MST_BUDGET_TYPE.BUDGET_CODE INNER JOIN
ECMS_MST_COMPANY ON #TEMPTABLE.Company = ECMS_MST_COMPANY.Company_Code INNER JOIN
ECMS_MST_COST_CENTER ON #TEMPTABLE.Costcenter = ECMS_MST_COST_CENTER.Cost_center_code INNER JOIN
ECMS_MST_SUB_ACCOUNT ON #TEMPTABLE.SubAccount = ECMS_MST_SUB_ACCOUNT.SUB_AC_CODE INNER JOIN
ECMS_MST_SALES_DIVISION ON #TEMPTABLE.SalesDivision = ECMS_MST_SALES_DIVISION.SALES_DIVISION_CODE INNER JOIN
ECMS_MST_DIVISION ON #TEMPTABLE.Division = ECMS_MST_DIVISION.DIVISION_CODE '
IF @BudgetYear<>0 AND @BudgetYear IS NOT NULL
SET @Select = @Select+ ' AND (BudgetYear=@BudgetYear) '
IF @BudgetYear IS NOT NULL
SET @Select = @Select+ ' AND (BudgetType=@BudgetVersion) '
IF @Company<>0 AND @Company IS NOT NULL
SET @Select = @Select+ ' AND (Company=@Company) '
IF @Division<>0 AND @Division IS NOT NULL
SET @Select = @Select+ ' AND (Division=@Division) '
IF @SalesDivision<>0 AND @SalesDivision IS NOT NULL
SET @Select = @Select+ ' AND (SalesDivision=@SalesDivision) '
IF @Costcenter<>0 AND @Costcenter IS NOT NULL
SET @Select = @Select+ ' AND (Costcenter=@Costcenter) '
IF @SubAccount<>0 AND @SubAccount IS NOT NULL
SET @Select = @Select+ ' AND (SubAccount=@SubAccount) '
IF @AsOnDate<>0 AND @AsOnDate IS NOT NULL
SET @Select = @Select+ ' AND (RQDate<=@AsOnDate) '
--print @Select
Execute sp_Executesql @Select, @Param , @BudgetYear, @BudgetVersion, @Company, @Division, @CostCenter, @SubAccount, @SalesDivision, @AsOnDate
END
SET NOCOUNT OFF
RETURN
Friday, October 9, 2009
Generating thumbnail of an image on the fly and saving it to the server.
Yup, yet another scenario where I fumed my mind. I was with a product catalogue application, for a POC (Proof of concept) to Malaysian client, where the registered users would be able to add a product details under a chosen category. The uploaded products will be listed in the home page based up on the category. Requirement was of very low complexity.
Generate random number generated from C# to give a unique name for the file which is going to be saved in the server. Generate the thumbnail image by specifying the width and height.
{
if (UploadImage.HasFile) {
try {
Random random = new Random();
int randumNumber = random.Next(1000);
string FolderPath = Server.MapPath("~") + "\\ProductImages\\";
string FileName = randumNumber.ToString() + "-" + UploadImage.FileName;
System.Drawing.Image myImage = System.Drawing.Image.FromStream(UploadImage.PostedFile.InputStream);
}
catch
{
MessageLabel.Text = "Unable to save the file";
}
{
return false;
}
Thinks are simple once you have a try, until then it would be complex. Now my concern is to have a water mark of the company logo on the main image on the fly. Come down,
Genrating Watermark on the fly
private void MakeWatermark()
{
string sProduct = Server.MapPath("ProductImage.jpg”);
string sLogo = Server.MapPath("logo.gif");
System.Drawing.Image oImage= Bitmap.FromFile(sProduct);
Graphics oGraphics = Graphics.FromImage(sLogo);
Bitmap oLogo = new Bitmap(s2);
oGraphics.DrawImage(oLogo, new Point(70, 70));
Response.ContentType = "image/JPEG";
oImage.Save(Response.OutputStream, ImageFormat.Jpeg);
}
Monday, September 21, 2009
Ajax Modal Popup Extender and ASP.Net Grid View Control
Had gone through a couple of blogs about having the modal popup extender of ASP.Net AJAX invoked from the button click of Grid view rows.
Posts w ere not many serving this requirement, though there were some where the Modal Popup Extender had been used in the Item Template of the grid view controls and the requirement is getting met. I could see the appreciations flowing to the blog poster. Well, I too appreciate those who took initiative to put forth a solution for the problem which ASP.Net developers have been facing.Now listen what I have to say you. Do you think keeping a control in an item template is a good and wise idea? How many modal popup extender instances get created while rendering the grid view control if
  there are one hundred records, and hence one hundred rows? Am I making sense?
Come on. keeping the modal popup extender inside the gridview’s item tempate is an absolute ridicule in this scenario. because, it is an overhead for the page. There are some other ways to get it done. Yup, here is the alternative.
Here we go, add a grid view in the page. Data bind the primary set of data where the result set primary key is, say RequestId in my scenario. Remove auto generate fields property of the columns of the grid view and add template fields to bind the result set. Keep an empty item template where we will later add the button, on click of this the popup to be invoked)
Let the Model Popup Extender be out side the grid, in the page itself. Do the settings of the properties as it is required to have for the modal popup. I guess, I don’t have to go through the settings required for it in detail. (If not, take a sneak peak here in the ASP.Net AJAX site. It is quite explanatory.)
Keep a Button, in the page (Not in the Grid view control), which has to be referred as the Target Control for the modal popup.
asp:Button ID="BtnPopUp" runat="server" Text="BtnPopUp" Width="0px"
Notice the width of the button, it is set to zero, won’t be visible at all when page is rendered. Surprising?, come on, this is a tricky way of doing it!
Insert a panel to the page from the Visual Studio toolbox; Keep a table in the panel where you can arrange your controls quite decently. Type “Click and Drag Popup Here” in the first row of the table where the id of theelement should be Id=”DragIt” and set the property runat=”server” for the TD element. This is to enhance the drag facility of the pop up throughout the page.
Keep your Controls (Another grid view control to show the details of each rows? Well, add it then), which have to be popped up on click of the buttons rendered in the grid view, in the table, inside the panel (Control id = PnlResponse), give fixed width for the panel, say 350px.. BtnCancel refers the ID of the button in the panel, on click of which the pop up disappears.
--cc1:ModalPopupExtender ID="MpeSendResponse" runat="server"
TargetControlID="BtnPopUp"PopupControlID="PnlResponse"
BackgroundCssClass="modalBackground"
DropShadow="true"
OkControlID="BtnCancel"
CancelControlID="BtnCancel"PopupDragHandleControlID="DragIt">
cc1:ModalPopupExtender—
Well, now we need to add a b utton control in the Item Template of the Grid view control.(Button control id=”GridsButton”) This Button has no settings for Model Popup extender.
Keep it as it is and Edit Data Bindings of this button control and data bind the required PrimaryKey of the particular row. Ie, Set the command argument as Eval(“RequestId”).
Add a Command Event for this button and in the command event,
You can get
protected void GridsButton_Command(object sender, CommandEventArgs e)
{
Int64 RequestId = Convert.ToInt64(e.CommandArgument);
CallAnotherMethodToShowMoreDetails(RequestId);
MpeViewResponse.Show();
}
All you need to do is to just invoke the Show() method of modal popup extender.
protected void CallAnotherMethodToShowMoreDetails(string RequestId)
{
//Do whatever you want with the RequestId.
}
You can fetch another set of records from the database by passing RequestId as the input parameter and display the result set in another grid view control kept in the pannel control (PnlResponse). Yup your pop up shows the details of the records when you click on the buttons in the parent grid view control.
Doesn’t it make sense?
Posts w
ere not many serving this requirement, though there were some where the Modal Popup Extender had been used in the Item Template of the grid view controls and the requirement is getting met. I could see the appreciations flowing to the blog poster. Well, I too appreciate those who took initiative to put forth a solution for the problem which ASP.Net developers have been facing.Now listen what I have to say you. Do you think keeping a control in an item template is a good and wise idea? How many modal popup extender instances get created while rendering the grid view control if there are one hundred records, and hence one hundred rows? Am I making sense?Come on. keeping the modal popup extender inside the gridview’s item tempate is an absolute ridicule in this scenario. because, it is an overhead for the page. There are some other ways to get it done. Yup, here is the alternative.
Here we go, add a grid view in the page. Data bind the primary set of data where the result set primary key is, say RequestId in my scenario. Remove auto generate fields property of the columns of the grid view and add template fields to bind the result set. Keep an empty item template where we will later add the button, on click of this the popup to be invoked)
Let the Model Popup Extender be out side the grid, in the page itself. Do the settings of the properties as it is required to have for the modal popup. I guess, I don’t have to go through the settings required for it in detail. (If not, take a sneak peak here in the ASP.Net AJAX site. It is quite explanatory.)
Keep a Button, in the page (Not in the Grid view control), which has to be referred as the Target Control for the modal popup.
asp:Button ID="BtnPopUp" runat="server" Text="BtnPopUp" Width="0px"
Notice the width of the button, it is set to zero, won’t be visible at all when page is rendered. Surprising?, come on, this is a tricky way of doing it!
Insert a panel to the page from the Visual Studio toolbox; Keep a table in the panel where you can arrange your controls quite decently. Type “Click and Drag Popup Here” in the first row of the table where the id of the
Keep your Controls (Another grid view control to show the details of each rows? Well, add it then), which have to be popped up on click of the buttons rendered in the grid view, in the table, inside the panel (Control id = PnlResponse), give fixed width for the panel, say 350px.. BtnCancel refers the ID of the button in the panel, on click of which the pop up disappears.
--cc1:ModalPopupExtender ID="MpeSendResponse" runat="server"
TargetControlID="BtnPopUp"PopupControlID="PnlResponse"
BackgroundCssClass="modalBackground"
DropShadow="true"
OkControlID="BtnCancel"
CancelControlID="BtnCancel"PopupDragHandleControlID="DragIt">
cc1:ModalPopupExtender—
Well, now we need to add a b
utton control in the Item Template of the Grid view control.(Button control id=”GridsButton”) This Button has no settings for Model Popup extender.Keep it as it is and Edit Data Bindings of this button control and data bind the required PrimaryKey of the particular row. Ie, Set the command argument as Eval(“RequestId”).
Add a Command Event for this button and in the command event,
You can get
protected void GridsButton_Command(object sender, CommandEventArgs e)
{
Int64 RequestId = Convert.ToInt64(e.CommandArgument);
CallAnotherMethodToShowMoreDetails(RequestId);
MpeViewResponse.Show();
}
All you need to do is to just invoke the Show() method of modal popup extender.
protected void CallAnotherMethodToShowMoreDetails(string RequestId)
{
//Do whatever you want with the RequestId.
}
You can fetch another set of records from the database by passing RequestId as the input parameter and display the result set in another grid view control kept in the pannel control (PnlResponse). Yup your pop up shows the details of the records when you click on the buttons in the parent grid view control.
Doesn’t it make sense?
Tuesday, September 1, 2009
MDX and SQL, the kissing cousins!
Quite interesting, yeah! Here we go,
If SQL is meant for create manage and query Relational Databases in OLTP(Online Transaction Processing) Systems, MDX, The Multi Dimensional Extension, is to perform calculations in OLAP(Online Analytical Processing) Databases.
Why MDX, and how important it is in Business Intelligence?
It is to query, navigate, and perform calculations in OLAP databases. OLAP databases are usually called as CUBES. Cubes are so called as the OLAP Databases comprises of multi Dimensional data. Though the cubes can have dozens of dimensions but rarely goes more than 15 to 20 to make them easier/understandable to work with. Cube consists of dimensions, hierarchies, levels, attributes and measures. MDX has been the strength of reporting and analysis in Business Intelligence (BI) as it supported virtually by many of the BI Server giants like Microsoft, IBM, Hyperion and SAP.
OLAP cubes are multidimensional database model which consists of measures and dimensions joined though a central fact table. As the arrangement of dimensions with a central fact table resembles a ‘star’, multidimensional database are called as ‘Star schemas’. At the same time we can compare OLTP database with ‘Spider Web’ as plenty of tables joined together through a complex set of primary and foreign key relationships.
Although you can theoretically query an OLAP cube using SQL, SQL has no inherent knowledge of dimension hierarchies and cannot easily navigate to the parent or children of a particular dimension member. Here comes the advantage of MDX over SQL. It can be used to navigate, query and perform calculations against multidimensional structures. Examples of Multidimensional structures are OLAP Cubes, dimensions, hierarchies, levels, attributes, members and measures.
MDX can recognize all kind of dimension relationship from ancestors to descendants f, from members to siblings, from root to leaf with very little coding. PeriodsToDate, LastPeriods, ParallelPeriod, YTD, QTD are few of the interesting 200 functions MDX have. (Interestingly, ParallelPeriod picks the data from a current period to the same period a year ago.) The queries for bringing these results in SQL would consume huge time and lines of code.
MDX was born on top of SQL to provide code consumption in dealing OLAP Server. OLAP Server was the invention of a third party called Panorama, and lately it was acquired by Microsoft.
Tuesday, August 18, 2009
Back button / Previous Page button in ASP.Net C#
Enabling Back Button in ASP.Net
There are different ways of doing it. I will just take you through two simple solutions.
First way is quite simple. A straight forward approach.
Declare a string variable public
static string goBackUrl = String.Empty;
protected void Page_Load(object sender, EventArgs e)
{
if (!IsPostBack)
{
goBackUrl = Request.UrlReferrer.ToString();
}
}
protected void BackButton_Click(object sender, EventArgs e)
{
Response.Redirect(goBackUrl);
}
Second one is with View State.
protected void Page_Load(object sender, EventArgs e)
{
if (!IsPostBack)
{
GoBackURL = Request.UrlReferrer.ToString();
ViewState.Add("GoBackURL", GoBackURL);
}
else
{
GoBackURL = ViewState["GoBackURL"].ToString();
}
protected void BackButton_Click(object sender, EventArgs e)
{
Response.Redirect(BackPath, false);
}
Wednesday, August 12, 2009
A Comparison of Traditional FTP Upload & WebDAV Feature of IIS
FTP (File Transfer Protocol) & IIS WebDAV
Why WebDEV and whats wrong with FTP?
The traditional method for uploading content to a web server is File Transfer Protocol (FTP), but using this approach has its disadvantages:
• Using FTP requires that you open additional ports on your perimeter firewall, and this can increase the attack surface of your network and make it more susceptible to penetration by attackers. This is obviously undesirable from the perspective of keeping your network secure.
• FTP has no file locking mechanism, so it’s possible for two users to upload different versions of the same file simultaneously causing one to be overwritten. This can mean lost time troubleshooting why an uploaded file is different from what you expect.
• The FTP approach means you have to edit your content locally on the client. In other words, to edit a page already on the web server you would have to download it to the client, edit it there, and then upload it again to the web server. This is a time-consuming and inefficient approach to managing content.
WebDAV offers the solution for all the above problem scenarios, It’s a protocol used for publishing and managing content to web servers. WebDAV is an extension of the HTTP/1.1 protocol described in RFCs 2518 and 3253. WebDAV overcomes the three issues described above as follows:
• WebDAV uses port 80, the same port used by HTTP for web access. So using WebDAV means you don’t have to open any extra ports on your firewall.
• WebDAV lets only one user modify a file at a time, while allowing multiple users to read it. This allows files to be locked while they are being edited, preventing unexpected changes from occurring.
• WebDAV lets you edit files on the server instead of needing to download them first to the client. Editing files remotely using WebDAV is as easy as if they were locally present, and the whole process is transparent to the content producer.
How to Install and Use WebDEV on your Server?
When we use Windows Server 2003 machine to the role of Application Server, it installs various IIS 6 components but WebDAV isn’t one of these components installed. This is different from the earlier Windows 2000 Server platform where installing IIS 5 automatically installed WebDAV as well. To install WebDAV on the IIS 6 machine, use Add or Remove Programs in Control Panel and run the Windows Components Wizard. You can see WebDAV under Application Server > Internet Information Services > World Wide Web Service > WebDAV Publishing. Check it and Install.
You need to enable it for IIS after the installation. To verify if enabled, check the WebDAV option under the Web Service Extensions node in IIS Manager. Open IIS (Start>Run>inetmgr) See Web Service Extensions at the left pane. You will be able to se WebDEV at the right pane, if you select the Wen\b Service WExtension from the left pane. Make sure that it is Allowed. Be noticed, when WebDAV extension (httpext.dll) is Allowed, it would be applicable for all websites on your server. IIS unfortunately does not let you configure WebDAV for each and every website separately.
What to be set at Client side?
To create and manage content for your website , WebDAV to be enabled on the client machines. Windows XP has a built-in WebDAV client that doesn’t need to be installed, only enabled. To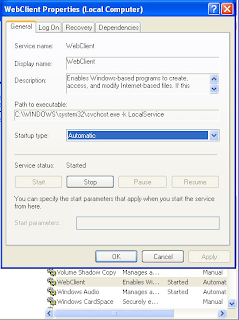 enable WebDAV on XP, open the Services console under Administrative Tools and find the WebClient service and double-click on this service to open its Properties. Change the Startup Type to Automatic, then click the Start button to run the service. Now you can publish the site content to your web server.
Settings on the Server for WebDAV
The physical directory where the Virtual directory points to be given read/write/directory listing permissions.
To publish content with WebDAV, the following web permissions on the directory to be enabled.
1. Read - lets users read what has been published to the server
2. Write - lets users upload new content to the server and edit existing content on the server
3. Directory listing - lets users view a list of published files on the server so they can select the one they want to view or edit.
If the Access is going to be given for a particular user group, It has to have Read, Read & Execute, and List Folder Contents permission. These are necessary for WebDAV users to be able to write and modify content on the web server. There are also two additional special permissions that the Users group has Create Files / Write Data, Create Folders / Append Data. These permissions too are necessary for WebDAV publishing, so don’t change them.
Publishing content with WebDEV
Go to Internet Explorer’s Menu, File>Open
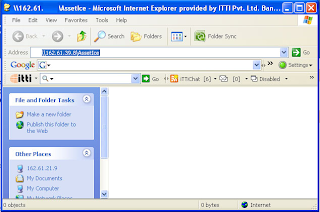
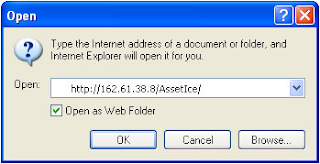 Check the ‘Open as Web‘ check box. Window will be opened with 0 Object displayed.
Now, drag and drop your Local files in this window, it reaches at the root of your Virtual Directory’s root on the remote server!. You can browse it as http://162.61.39.8/Assetice/NewFile.aspx
Why WebDEV and whats wrong with FTP?
The traditional method for uploading content to a web server is File Transfer Protocol (FTP), but using this approach has its disadvantages:
• Using FTP requires that you open additional ports on your perimeter firewall, and this can increase the attack surface of your network and make it more susceptible to penetration by attackers. This is obviously undesirable from the perspective of keeping your network secure.
• FTP has no file locking mechanism, so it’s possible for two users to upload different versions of the same file simultaneously causing one to be overwritten. This can mean lost time troubleshooting why an uploaded file is different from what you expect.
• The FTP approach means you have to edit your content locally on the client. In other words, to edit a page already on the web server you would have to download it to the client, edit it there, and then upload it again to the web server. This is a time-consuming and inefficient approach to managing content.
WebDAV offers the solution for all the above problem scenarios, It’s a protocol used for publishing and managing content to web servers. WebDAV is an extension of the HTTP/1.1 protocol described in RFCs 2518 and 3253. WebDAV overcomes the three issues described above as follows:
• WebDAV uses port 80, the same port used by HTTP for web access. So using WebDAV means you don’t have to open any extra ports on your firewall.
• WebDAV lets only one user modify a file at a time, while allowing multiple users to read it. This allows files to be locked while they are being edited, preventing unexpected changes from occurring.
• WebDAV lets you edit files on the server instead of needing to download them first to the client. Editing files remotely using WebDAV is as easy as if they were locally present, and the whole process is transparent to the content producer.
How to Install and Use WebDEV on your Server?
When we use Windows Server 2003 machine to the role of Application Server, it installs various IIS 6 components but WebDAV isn’t one of these components installed. This is different from the earlier Windows 2000 Server platform where installing IIS 5 automatically installed WebDAV as well. To install WebDAV on the IIS 6 machine, use Add or Remove Programs in Control Panel and run the Windows Components Wizard. You can see WebDAV under Application Server > Internet Information Services > World Wide Web Service > WebDAV Publishing. Check it and Install.
You need to enable it for IIS after the installation. To verify if enabled, check the WebDAV option under the Web Service Extensions node in IIS Manager. Open IIS (Start>Run>inetmgr) See Web Service Extensions at the left pane. You will be able to se WebDEV at the right pane, if you select the Wen\b Service WExtension from the left pane. Make sure that it is Allowed. Be noticed, when WebDAV extension (httpext.dll) is Allowed, it would be applicable for all websites on your server. IIS unfortunately does not let you configure WebDAV for each and every website separately.
What to be set at Client side?
To create and manage content for your website , WebDAV to be enabled on the client machines. Windows XP has a built-in WebDAV client that doesn’t need to be installed, only enabled. To
 enable WebDAV on XP, open the Services console under Administrative Tools and find the WebClient service and double-click on this service to open its Properties. Change the Startup Type to Automatic, then click the Start button to run the service. Now you can publish the site content to your web server.
Settings on the Server for WebDAV
The physical directory where the Virtual directory points to be given read/write/directory listing permissions.
To publish content with WebDAV, the following web permissions on the directory to be enabled.
1. Read - lets users read what has been published to the server
2. Write - lets users upload new content to the server and edit existing content on the server
3. Directory listing - lets users view a list of published files on the server so they can select the one they want to view or edit.
If the Access is going to be given for a particular user group, It has to have Read, Read & Execute, and List Folder Contents permission. These are necessary for WebDAV users to be able to write and modify content on the web server. There are also two additional special permissions that the Users group has Create Files / Write Data, Create Folders / Append Data. These permissions too are necessary for WebDAV publishing, so don’t change them.
Publishing content with WebDEV
Go to Internet Explorer’s Menu, File>Open
 Check the ‘Open as Web‘ check box. Window will be opened with 0 Object displayed.
Now, drag and drop your Local files in this window, it reaches at the root of your Virtual Directory’s root on the remote server!. You can browse it as http://162.61.39.8/Assetice/NewFile.aspx

Generic Handlers to display images from database in a gridview from database.
Generic Handler ; A ‘Generic’ way to find the solution.
Was fuming my head to fetch the logo image from SQL Server database (Not the URL, Image stored as the type image, in binary format). Plenty of try outs could lead me in to the solution.
ASP.Net 2.0 does not allow images(binary format) from the database and directly databind to a control in the page. There are some tricky things to get it done, Take a sneak peak.
Here is my Company Master Table
 Allow null I used as this field was an addition to the master table which has got references to the transactions. Hope you understood the significance of allowed null. Well, leave that topic, it doesn’t make any sense in this topic.
I had to deal with two presentation layer files for this scenario. One is the .aspx page where my grid view sits with data bound with all the company information, except the logo, and the other, an ASHX file to custom handle the request. Try binding the logo entity to the server side image control, its not gonna work out.
So bind all other fields of Company master to the grid’s item templates and see how the image can be displayed. Here comes the role of Generic Handler.
Generic Handlers are equivalent to custom handlers and they contain classes that fully implement IHttpHandler. All you need is to simply surf the Generic Handler (ASHX) files and they're compiled automatically just as ASPX file works.
Advantages of Generic Handlers
The advantage of using the generic handler is twofold. First, it's usually much more convenient to generate a simple handler than it is to create a whole new assembly to handle the request. Second, you don't need to run interference with either Web.Config or with IIS. That is, Web.Config and IIS already understand what to do about files with the extension of .ashx. Installing ASP.NET places those when mapping into IIS.
Limitations
However, ASHX files have the same limitations as ASPX and ASCX files in terms of their place in an ASP.NET project. Simple generic handlers go with the project. That is, for the handler to work, it must accompany the whole project. Alternatively, custom handlers deployed as separate assemblies may be deployed and shared among the enterprise as Global Assembly assemblies (that is, strongly named assemblies placed in the Global Assembly Cache).
Back to our problem; added an image control in the template field of the grid view where I had to load the Company Logo.Hope you know the way of creating a Generic Handler. If not follow these steps.
Right click on the Website Project and Add New item in the Solution Explorer of Visual Studio IDE.
 My Stored Procedure fetches the image field from Company Master for a particular Company ID. This ID had to be provided from the Grid View’s Item template as a Query String to the Generic Handler.

No big deal, accepted the query string and passed it to Stored Procedure and fetch the data as byte[]. Did a binary write of the fetched data. From the ASPX page, ie, my Master Dot Net Page,
public void ProcessRequest (HttpContext context) {
Was fuming my head to fetch the logo image from SQL Server database (Not the URL, Image stored as the type image, in binary format). Plenty of try outs could lead me in to the solution.
ASP.Net 2.0 does not allow images(binary format) from the database and directly databind to a control in the page. There are some tricky things to get it done, Take a sneak peak.
Here is my Company Master Table
I had to deal with two presentation layer files for this scenario. One is the .aspx page where my grid view sits with data bound with all the company information, except the logo, and the other, an ASHX file to custom handle the request. Try binding the logo entity to the server side image control, its not gonna work out.
So bind all other fields of Company master to the grid’s item templates and see how the image can be displayed. Here comes the role of Generic Handler.
Generic Handlers are equivalent to custom handlers and they contain classes that fully implement IHttpHandler. All you need is to simply surf the Generic Handler (ASHX) files and they're compiled automatically just as ASPX file works.
Advantages of Generic Handlers
The advantage of using the generic handler is twofold. First, it's usually much more convenient to generate a simple handler than it is to create a whole new assembly to handle the request. Second, you don't need to run interference with either Web.Config or with IIS. That is, Web.Config and IIS already understand what to do about files with the extension of .ashx. Installing ASP.NET places those when mapping into IIS.
Limitations
However, ASHX files have the same limitations as ASPX and ASCX files in terms of their place in an ASP.NET project. Simple generic handlers go with the project. That is, for the handler to work, it must accompany the whole project. Alternatively, custom handlers deployed as separate assemblies may be deployed and shared among the enterprise as Global Assembly assemblies (that is, strongly named assemblies placed in the Global Assembly Cache).
Back to our problem; added an image control in the template field of the grid view where I had to load the Company Logo.Hope you know the way of creating a Generic Handler. If not follow these steps.
Right click on the Website Project and Add New item in the Solution Explorer of Visual Studio IDE.
 My Stored Procedure fetches the image field from Company Master for a particular Company ID. This ID had to be provided from the Grid View’s Item template as a Query String to the Generic Handler.

No big deal, accepted the query string and passed it to Stored Procedure and fetch the data as byte[]. Did a binary write of the fetched data. From the ASPX page, ie, my Master Dot Net Page,
public void ProcessRequest (HttpContext context) {
SqlConnection con = new SqlConnection();
con.ConnectionString = ConfigurationManager.ConnectionStrings["MyConnString"].ConnectionString;
SqlCommand cmd = new SqlCommand();
cmd.CommandText = "select CH_CMP_LOGO from CH_CMP_INFO where CH_CMP_ID = @ID";
cmd.CommandType = System.Data.CommandType.Text;
cmd.Connection = con;
SqlParameter ImageID = new SqlParameter("@ID", System.Data.SqlDbType.Int);
ImageID.Value = context.Request.QueryString["ID"];
cmd.Parameters.Add(ImageID);
con.Open();
SqlDataReader dReader = cmd.ExecuteReader();
dReader.Read();
context.Response.BinaryWrite((byte[])dReader["CH_CMP_LOGO"]);
dReader.Close();
con.Close();
}
I could browse and view the company listing.
 Happy!
 Happy!
sorry, i forgot to tell about the data access layer specialty to fetch the image.
int logoImageIndex = reader.GetOrdinal("CH_CMP_LOGO");
if (!reader.IsDBNull(logoImageIndex))
{
companyListingEntity.LogoImage = new Byte[(reader.GetBytes(logoImageIndex, 0, null, 0, int.MaxValue))];
reader.GetBytes(logoImageIndex, 0, companyListingEntity.LogoImage, 0, companyListingEntity.LogoImage.Length);
}
Monday, August 10, 2009
Service Unavailable error message when you browse a MOSS / WSS site or Central Admin.
IIS must be the reason for this. Do an IIS reset and see. If the problem persists, Just check the farm administrators password which has been set on the Application Pool.
To see this, go to Application Pool of both your site and the Central Administration site and right click to see the properties. Go to Identity tab and see the account name.
Make sure that the password is latest. If your network policy is defined some password expiration policy, you must have changed the password of the farm admin's domain password. Some times this to be reset in the Application Pool also. Do it for all the application pools of the sites which are not running and saying 'Service Unavailable'.
Give the new password in the identity tab and reset the iis.
run>cmd> iisreset
Hope it works fine now.
Wednesday, August 5, 2009
What next? Yeah, I got JQuery in hand !
What next, if the server side controls are rendered in to pure html? Has developer all done with coding? Not at all, jQuery can do a million at the front end.
 Quite surprisingly, the client manager asked us to display the details of an internal order in a new table right after the selected row of the grid view by adding a new row in the grid view. What to do when the server side code has lost the control after the code has been rendered in to the browser? We went Google to come out of the trouble.
jQuery was the answer we found to relax a bit. The code snippets we found during our search made us wonder line by line. Hours of R&D brought us delight, could present it pretty decently up to the expectation.
Have a sneak peek here, this is the way we done it.
Added a button control in the item template of the Grid view. Attached a VB.Net Function in the Client Click event of the button, passing the Internal Order Number (PK) to it.

This VB Function triggers the Javascript Function defined in an external file. Passing Internal Order number and the current object Id. This Javascript method gets the parent object of the button, which is aelement with help of jQuery and the object with the help of TD object.
Checking the value of the button control for + ( ie in collapsed mode ) and if collapsed, calling a Web service which returns the Result set for a particular Internal Order Number.
Just see how handy jQuery is
function LoadSummaryDetails(internalOderno,btnID, myObj)
{
btn=$('#'+btnID);
var btnVal=$(btn).attr('value');
td=$('#'+btnID).parent();
tr=$(td).parent();
if(btnVal == '+')
{
InternalOrder.InternalOrderXmlData.GenerateChildSummaryDetails(internalOderno,GridSucceedCallback);
}
else
{
$(btn).attr('value','+');
$(btn).attr('class','Expand');
var nextRow= $(tr).next();
$(nextRow).remove();
}
return false
}
Web Service method returns a result set as a string object with the help of a string builder object.
The Callback function associated with the web service call does the following steps
1. Assigns the value ‘-‘ to the grid’s button ( To ‘Expanded’ mode)
2. Setting the CSS class for the button.
3. Creating a newRow object and adding the result set returned by the Web service to it.
4. Adding the row after the current row.
function GridSucceedCallback(result,eventAgrs)
{
$(btn).attr('value','-');
$(btn).attr('class','Collapse');
var newRow = $("
$(newRow).append(" "+result+" ");
$(tr).after(newRow);
}
See the else block of the LoadSummaryDetails() function.
$(btn).attr('value','+');
$(btn).attr('class','Expand');
var nextRow= $(tr).next();
$(nextRow).remove();
On Click of ‘Collapse‘ button,
1. Set the value back to ‘+’ ( to ‘Collapsed’ mode)
2. Changing the css style
3. Getting the next row of the current row object where the Detials have been added.
4. Removing the row.
 Quite surprisingly, the client manager asked us to display the details of an internal order in a new table right after the selected row of the grid view by adding a new row in the grid view. What to do when the server side code has lost the control after the code has been rendered in to the browser? We went Google to come out of the trouble.
jQuery was the answer we found to relax a bit. The code snippets we found during our search made us wonder line by line. Hours of R&D brought us delight, could present it pretty decently up to the expectation.
Have a sneak peek here, this is the way we done it.
Added a button control in the item template of the Grid view. Attached a VB.Net Function in the Client Click event of the button, passing the Internal Order Number (PK) to it.

This VB Function triggers the Javascript Function defined in an external file. Passing Internal Order number and the current object Id. This Javascript method gets the parent object of the button, which is a
Checking the value of the button control for + ( ie in collapsed mode ) and if collapsed, calling a Web service which returns the Result set for a particular Internal Order Number.
Just see how handy jQuery is
function LoadSummaryDetails(internalOderno,btnID, myObj)
{
btn=$('#'+btnID);
var btnVal=$(btn).attr('value');
td=$('#'+btnID).parent();
tr=$(td).parent();
if(btnVal == '+')
{
InternalOrder.InternalOrderXmlData.GenerateChildSummaryDetails(internalOderno,GridSucceedCallback);
}
else
{
$(btn).attr('value','+');
$(btn).attr('class','Expand');
var nextRow= $(tr).next();
$(nextRow).remove();
}
return false
}
Web Service method returns a result set as a string object with the help of a string builder object.
The Callback function associated with the web service call does the following steps
1. Assigns the value ‘-‘ to the grid’s button ( To ‘Expanded’ mode)
2. Setting the CSS class for the button.
3. Creating a newRow object and adding the result set returned by the Web service to it.
4. Adding the row after the current row.
function GridSucceedCallback(result,eventAgrs)
{
$(btn).attr('value','-');
$(btn).attr('class','Collapse');
var newRow = $("
$(newRow).append("
$(tr).after(newRow);
}
See the else block of the LoadSummaryDetails() function.
$(btn).attr('value','+');
$(btn).attr('class','Expand');
var nextRow= $(tr).next();
$(nextRow).remove();
On Click of ‘Collapse‘ button,
1. Set the value back to ‘+’ ( to ‘Collapsed’ mode)
2. Changing the css style
3. Getting the next row of the current row object where the Detials have been added.
4. Removing the row.
How to know the version of the SharePoint you are using
Go to Control Panel -> Add and Remove Programs.
OR, Go to (Windows) Start>Run>
Type appwiz.cpl
OR, Go to (Windows) Start>Run>
Type appwiz.cpl

Select the product (sharepoint server) and then click: Click here for support.
Or: Under Tasks, Click "View Installed Updates"
Doesn't it answer your querry? :) Window must have popped up and said about your current SharePoint version.
Saturday, July 11, 2009
It is an error to use a section registered as allowDefinition='MachineToApplication' beyond application level, More than one Web.config
You may get this error when trying to browse an asp.net application.
The debug information shows that "This error can be caused by a virtual directory not being configured as an application in IIS."
However, this error occurs primarily out of 2 scenarios.
1. When you create an new web application using visual studio.net, it automatically creates the virtual directory and configures it as an application.
However, if you manually create the virtual directory and it is not configured as an application, then you will not be able to browse the application and
may get the above error. The debug information you get as mentioned above, is applicable to this scenario.
To resolve it, Right Click on the virtual directory - select properties and then click on "Create" next to the "Application" Label and the textbox. It will
automatically create the "application" using the virtual directory's name. Now the application can be accessed.
2. When you have sub-directories in your application, you can have web.config file for the sub-directory. However, there are certain properties which cannot
be set in the web.config of the sub-directory such as authentication, session state (you may see that the error message shows the line number where the
authentication or sessionstate is declared in the web.config of the sub-directory). The reason is, these settings cannot be overridden at the sub-directory level
unless the sub-directory is also configured as an application (as mentioned in the above point).
Mostly we have the practice of adding web.config in the sub-directory if we want to protect access to the sub-directory files (say, the directory is admin and we
wish to protect the admin pages from unathorized users).
But actually, this can be achieved in the web.config at the application's root level itself, by specifing the location path tags and authorization, as follows:-
However, if you wish to have a web.config at the sub-directory level and protect the sub-directory, you can just specify the Authorization mode as follows:-
Thus you can protect the sub-directory from unauthorized access.
Thursday, June 18, 2009
Menu control (Asp.net 2.0) is not displaying properly in Google chrome and IE8 (Beta).
Though the Asp.net 2.0 menu control was displaying fine in IE 6 and Mozilla, There were issues with mouse hover styles and alignment in Google Chrome and IE 8. I was scratching my head over and over for long.
Could find a solution to tackle this issue. This is really interesting.
The C# version of the solution is as follows:
( If you got a master page for the application / website, write this snippet in it's PreInit event )
protected void Page_PreInit(object sender, EventArgs e)
{
if (!IsPostBack)
{
if ((Request.UserAgent.IndexOf("AppleWebKit") > 0 ) || (Request.UserAgent.IndexOf("Unknown") > 0 ) || ( Request.UserAgent.IndexOf("Chrome") > 0 ))
{
Request.Browser.Adapters.Clear();
}
}
}
Happy hours ! It works for Chrome. Im trying for IE 8. Let me know if some one can give some ideas.
Tuesday, June 9, 2009
Export Excel Data to SQL Server Database
Stored procedure for Exporting data from Excel Sheet to SQL Server Table.
CREATE TABLE [dbo].[MyAddressTable] (
[FirstName] VARCHAR(20),
[LastName] VARCHAR(20),
[ZIP] VARCHAR(10)
)
GO
SELECT * FROM [MyTestDB].[dbo].[MyAddressTable]
INSERT INTO [MyTestDB].[dbo].[MyAddressTable] ( [FirstName], [LastName], [ZIP] )
SELECT [FirstName], [LastName], [ZIP]
FROM OPENROWSET('Microsoft.Jet.OLEDB.4.0',
'Excel 8.0;Database=E:\sabin\Try.xls;IMEX=1',
'SELECT * FROM [Sheet1$]')
It does not need to have excel to be installed in the Server machine where SQL Server is installed. All you need to have is a file of .xls in the server.
OPENROWSET featire to be enabled through SQL Server Surface Area Configuration.
Start > SQL Server 2005 > Configuration Tools > Surface Area Configuration
Click Surface Area Configuration for Features
Click on Database Engine and Check the Enable OPENROWSET and OPENDATA..
Done !
Monday, May 11, 2009
Could not initialize Photoshop because the file is locked. Use the 'Properties' command in the Windows explorer
On MS Windows XP Professional (SP1) when a limited user tries to start
Adobe Photoshop CS v.8.0 he gets the following error message:
"Could not initialize Photoshop because the file is locked.
Use the 'Properties' command in the Windows Explorer to unlock the file."
It seems that the cause of the problem is the location for Photoshop
scratch file (a kind of temporary file. In Photoshop CS you can set the
volumes (i.e. partitions) for scratch files in the following way:
Edit -> Preferences -> Plug-Ins & Scratch Disks
You can define up to four scratch volumes.
Here is how the problem happened in my case:
The Photoshop CS v.8.0 was installed by an administrator on the system
partition, i.e. on the partition where the Windows folder is located
(also the "Documents and Settings" and "Program Files" folders) -- by
default this is the C: partition.
When the Photoshop was first started by a limited user account (who
was not member of the local administrators group) he got the following
message:
"You currently have Adobe Photoshop's primary Scratch and Windows'
primary paging file on the same volume, which can result in reduced
performance. It is recommended that you set Adobe Photoshop's primary
Scratch volume to be on a different volume, preferably on a different
physical drive."
Following that recommendation the user set the Photoshop first scratch
volume to D:\ (this was the second hard disk on his PC). But after
closing Photoshop he was unable to start it again because of the
error, "Could not initialize Photoshop because the file is locked ..."
The problem is that the Photoshop is unable to create the scratch file
on the D: partition as in Windows XP limited users don't have right by
default to create files on the root of a partition (D:\).
On the other hand if the first scratch volume is set to "Startup",
then Photoshop opens the scratch file on the partition where it was
installed, which is here the system partition. More precisely, in that
case Photoshop opens the scratch file in the temporary folder pointed
by the TEMP and TMP Windows environment variables. By default, these
variables have the value, "%USERPROFILE%\Local Settings\Temp" where
%USERPROFILE% is another Windows environment variable that points to
the user profile folder, e.g. "C:\Documents and %Settings\user_name".
Conclusion: if you want to have the Photoshop scratch file on a
partition which is not the system partition, you also have to have
right to write files to the root of that partition.
If you are not allowed to have that right, then as a workaround you
can restore the Photoshop default user preferences by renaming or
deleting the "Adobe Photoshop CS Prefs.psp" file in your user profile
folder -- more precisely in the folder,
%USERPROFILE%\Application Data\Adobe\Photoshop\8.0\Adobe Photoshop CS Settings\
(you can copy the path and open it in the Windows Explorer).
In my opinion this is a bug in Photoshop. When user changes the
scratch drives, Photoshop should check if it is able to open a file on
the corresponding location before allowing the change. Also, if it is
unable to open the scratch file afterwards, it should try to open the
file at another location.
According to some previous articles in the news groups, this bug also
existed in some previous versions of Photoshop and it is strange that
it hasn't been corrected yet.
Tuesday, May 5, 2009
The permissions granted to user (IUSR) are insufficient for performing this operation." when trying to view Report Site
The permissions granted to user (IUSR) are insufficient for performing this operation." when trying to view Report Site.
The permissions granted to user are insufficient for performing this operation. (rsAccessDenied)
Go to My Computer, Right click and get the User Management by clicking Manage. See the Users in the Machine. Right Click on the IUSR_MACHINENAME and view the Properties. Get the “Member Of” tab and add “Administrators” group in the Members List.
Now browse http://Server Name or IP/Reports/ (Report Browsers)
http://Server Name or IP/ReportServer (Report Manager)
Works fine !
Microsoft.ReportingServices.RsProxy.AccessDeniedException
I Came across this error message (Exception of type 'Microsoft.ReportingServices.RsProxy.AccessDeniedException' was thrown. ) today whilst installing SQL Server 2005 Reporting Services on a windows 2003 server
thought i'd share the answer for anybody else search as there wasn't much on the Internet for it.
To fix the issue I followed these steps :-
Go to Report Manager
Select Site Settings from the top right menu
Select Configure item-level role definitions
Select Content Manager
make sure all the tick boxes are ticked
For myself the Manage / View models tickboxes were not ticked and this fixed the issue
Hope this helps you out.
Tuesday, March 31, 2009
Iterating through All the Folders in your Sharepoint Site
Recently I got a request from a client to get a report of the number of items they had in the document libraries on their site. They wanted it broken down with the number of files per site, document library, and eventually per folder. Anyways its a fairly simple procedure (or so I think anyways), but figured I’d post it up since its been a while since I’ve thrown anything up. The code is broken into two methods, the first is used to iterate through all the child webs of a given SPWeb and also iterates through all the lists for that web and then calls the second method to interate through all the folders in a given list.
public void CrawlWeb(SPWeb web)
{
foreach (SPList list in web.Lists)
{
CrawlFolder(list.RootFolder);
}
foreach (SPWeb subWeb in web.Webs)
{
CrawlWeb(subWeb);
}
}
public void CrawlFolder(SPFolder folder)
{
if (folder != null && folder.Name.CompareTo(“forms”) != 0)
{
foreach (SPFolder subFolder in folder.SubFolders)
{
CrawlFolder(subFolder);
}
}
}
Tuesday, March 17, 2009
adding a new menu Item in Sharepoint. (SharePoint Features)
WSS 3.0 - How to create new SharePoint Feature?
How to create New Feature in WSS 3.0? / MOSS 2007
How to add new menu item under “Site Settings” menu in wss 3.0?
1. Create a new folder, called “SabinsNewFeature”, in C:\Program Files\Common Files\Microsoft Shared\web server extensions\12\TEMPLATE\FEATURES
2. Create an Xml file, called “feature.xml” in the “MyListUserFeature” folder
3. Edit the feature.xml file and add the following content
Description="Custom action on Site Actions"
Version="1.0.0.0"
Scope="Site"
xmlns="http://schemas.microsoft.com/sharepoint/">
4. Replace the GUID placeholder in the previous Id attribute, generate a GUID by running guidgen.exe, located in Local_Drive:\Program Files\Microsoft Visual Studio 8\Common7\Tools.
Create an Xml file, called “ListUsers.xml” in the “SabinsNewFeature” folder
5. Edit the file and add the following content
Location="Microsoft.SharePoint.StandardMenu"
Sequence="1000"
Title="List Users">
6. Install the new feature by running the following command by going to Start>Run>cmd
change to the following directory: %COMMONPROGRAMFILES%\Microsoft shared\Web server extensions\12\Bin. (Because, STSADM.EXE sits in this folder )
Execute the following command from the above location
Stsadm –o installfeature –filename SabinsNewFeature\feature.xml
You will get a message saying "Operation completed Successfully"
7. Activate the new feature by running the following command
stsadm –o activatefeature -filename SabinsNewFeature\feature.xml -url http://siteurl
if your site has been in the port,
stsadm –o activatefeature -filename SabinsNewFeature\feature.xml -url http://siteul:port number
Now you will see the new menu item in the "Site Settings" of the site that you installed the feature.
Wednesday, March 4, 2009
SQL Server: "Cannot open user default database" Error 4064
SQL Server 2005
You can use the sqlcmd utility to change the default database in SQL Server 2005. To do this, follow these steps:
Click Start, click Run, type cmd, and then press ENTER.
Use one of the following methods, depending on the kind of authentication that the SQL Server login uses:
If the SQL Server login uses Microsoft Windows authentication to connect to the instance, type the following at the command prompt, and then press ENTER:
sqlcmd –E -S InstanceName –d master
If the SQL Server login uses SQL Server authentication to connect to the instance, type the following at the command prompt, and then press ENTER:
sqlcmd -S InstanceName -d master -U SQLLogin -P Password
Note InstanceName is a placeholder for the name of the SQL Server 2005 instance to which you are connecting. SQLLogin is a placeholder for the SQL Server login whose default database has been dropped. Password is a placeholder for the SQL Server login password.
At the sqlcmd prompt, type the following, and then press ENTER:
ALTER LOGIN SQLLogin WITH DEFAULT_DATABASE = AvailDBName
Note AvailDBName is a placeholder for the name of the existing database that can be accessed by the SQL Server login in the instance.
At the sqlcmd prompt, type GO, and then press ENTER.
Tuesday, March 3, 2009
Enable remote connections to the SQL Server 2005 instance that hosts the report server database
Click Start, point to Programs, point to Microsoft SQL Server 2005,
oint to Configuration Tools, and click SQL Server Surface Area Configuration Tool.
Click Surface Area Configuration for Services and Connections.
Open the folder for the SQL Server instance that hosts the report server databases.
Click 'Remote Connections' under 'Database Engine'
Click Local and Remote Connections.
Click Using both TCP/IP and named pipes.
Click OK, and then restart the service by selecting "service" and clicking the "Stop" button at the right pane.
click "Start" button after stoping it.
Monday, January 19, 2009
Adding dynamic hyperlinks in the Report Viewer; ASP.Net Reports
Adding dynamic hyperlinks in the Report Viewer; ASP.Net Reports
Type the text to be displayed as the Hyperlink in the cell of your Table control added in the RDLC file. Right click on the Hyperlink text cell and click 'Navigation' tab.
Click Jump to URL radio button and add expression by clicking 'fx' button.
=iif(1<>0, Parameters!MyLink.Value+"?qBTchId=" & Fields!BatchID.Value, "")
Report Parameters can be sent from the code behind file as
Microsoft.Reporting.WebForms.ReportParameter RptLink1 = new Microsoft.Reporting.WebForms.ReportParameter("AssignLink", UriBuilder.BuildUrlNew(@"../Training/FrmAssignTraining.aspx"));
Microsoft.Reporting.WebForms.ReportParameter RptLink2 = new Microsoft.Reporting.WebForms.ReportParameter("UpdateLink", UriBuilder.BuildUrlNew(@"../Training/FrmTrainingUpdate.aspx"));
Microsoft.Reporting.WebForms.ReportParameter RptLink3 = new Microsoft.Reporting.WebForms.ReportParameter("PrintLink", UriBuilder.BuildUrlNew(@"../Training/FrmTrainingPrint.aspx"));
RptTraining.LocalReport.SetParameters(new Microsoft.Reporting.WebForms.ReportParameter[] { RptLink1, RptLink2, RptLink3 });
RptTraining.LocalReport.EnableHyperlinks = true;
=iif(1<>0,Fields!Status.Value, "")
******************/
using System;
using System.Data;
using System.Configuration;
using System.Web;
using System.Web.Security;
using System.Web.UI;
using System.Web.UI.WebControls;
using System.Web.UI.WebControls.WebParts;
using System.Web.UI.HtmlControls;
///
/// The common class for building the URL for the report. Eg: UriBuilder.BuilUri("FrmAdvance.aspx");
///
public class UriBuilder
{
public UriBuilder()
{
//
// TODO: Add constructor logic here
//
}
///
/// This method Builds the physical Url with the page name provided
///
/// The name of the page
/// The URL string
public static string BuildUrl(string pageName)
{
Uri uri = new Uri(HttpContext.Current.Request.Url.AbsoluteUri);
Uri newUri = new Uri(uri, pageName);
return newUri.AbsoluteUri;
}
public static string BuildUrlNew(string pageName)
{
Uri uri = new Uri(HttpContext.Current.Request.Url.AbsoluteUri.Replace("/FeedBackQuality", ""));
Uri uri2 = new Uri(
Uri newUri = new Uri(uri, pageName);
return newUri.AbsoluteUri;
}
}

Report viewer; changing the cell background color dynamically
Report viewer; how to change the cell background color dynamically?
Select the cell which has to be colored, and press 'f4' key to get the 'properties' window of Visual Studio IDE. Go to 'BackgroundColor' property and click the '' under the dropdown list.
Just give a condition for your entity property.
=iif(Fields!TotalPrice.Value = "2500", "DarkGray", "")
Select the cell which has to be colored, and press 'f4' key to get the 'properties' window of Visual Studio IDE. Go to 'BackgroundColor' property and click the '
Just give a condition for your entity property.
=iif(Fields!TotalPrice.Value = "2500", "DarkGray", "")
Subscribe to:
Posts (Atom)