Enabling Back Button in ASP.Net
There are different ways of doing it. I will just take you through two simple solutions.
First way is quite simple. A straight forward approach.
Declare a string variable public
static string goBackUrl = String.Empty;
protected void Page_Load(object sender, EventArgs e)
{
if (!IsPostBack)
{
goBackUrl = Request.UrlReferrer.ToString();
}
}
protected void BackButton_Click(object sender, EventArgs e)
{
Response.Redirect(goBackUrl);
}
Second one is with View State.
protected void Page_Load(object sender, EventArgs e)
{
if (!IsPostBack)
{
GoBackURL = Request.UrlReferrer.ToString();
ViewState.Add("GoBackURL", GoBackURL);
}
else
{
GoBackURL = ViewState["GoBackURL"].ToString();
}
protected void BackButton_Click(object sender, EventArgs e)
{
Response.Redirect(BackPath, false);
}

Tuesday, August 18, 2009
Wednesday, August 12, 2009
A Comparison of Traditional FTP Upload & WebDAV Feature of IIS
FTP (File Transfer Protocol) & IIS WebDAV
Why WebDEV and whats wrong with FTP?
The traditional method for uploading content to a web server is File Transfer Protocol (FTP), but using this approach has its disadvantages:
• Using FTP requires that you open additional ports on your perimeter firewall, and this can increase the attack surface of your network and make it more susceptible to penetration by attackers. This is obviously undesirable from the perspective of keeping your network secure.
• FTP has no file locking mechanism, so it’s possible for two users to upload different versions of the same file simultaneously causing one to be overwritten. This can mean lost time troubleshooting why an uploaded file is different from what you expect.
• The FTP approach means you have to edit your content locally on the client. In other words, to edit a page already on the web server you would have to download it to the client, edit it there, and then upload it again to the web server. This is a time-consuming and inefficient approach to managing content.
WebDAV offers the solution for all the above problem scenarios, It’s a protocol used for publishing and managing content to web servers. WebDAV is an extension of the HTTP/1.1 protocol described in RFCs 2518 and 3253. WebDAV overcomes the three issues described above as follows:
• WebDAV uses port 80, the same port used by HTTP for web access. So using WebDAV means you don’t have to open any extra ports on your firewall.
• WebDAV lets only one user modify a file at a time, while allowing multiple users to read it. This allows files to be locked while they are being edited, preventing unexpected changes from occurring.
• WebDAV lets you edit files on the server instead of needing to download them first to the client. Editing files remotely using WebDAV is as easy as if they were locally present, and the whole process is transparent to the content producer.
How to Install and Use WebDEV on your Server?
When we use Windows Server 2003 machine to the role of Application Server, it installs various IIS 6 components but WebDAV isn’t one of these components installed. This is different from the earlier Windows 2000 Server platform where installing IIS 5 automatically installed WebDAV as well. To install WebDAV on the IIS 6 machine, use Add or Remove Programs in Control Panel and run the Windows Components Wizard. You can see WebDAV under Application Server > Internet Information Services > World Wide Web Service > WebDAV Publishing. Check it and Install.
You need to enable it for IIS after the installation. To verify if enabled, check the WebDAV option under the Web Service Extensions node in IIS Manager. Open IIS (Start>Run>inetmgr) See Web Service Extensions at the left pane. You will be able to se WebDEV at the right pane, if you select the Wen\b Service WExtension from the left pane. Make sure that it is Allowed. Be noticed, when WebDAV extension (httpext.dll) is Allowed, it would be applicable for all websites on your server. IIS unfortunately does not let you configure WebDAV for each and every website separately.
What to be set at Client side?
To create and manage content for your website , WebDAV to be enabled on the client machines. Windows XP has a built-in WebDAV client that doesn’t need to be installed, only enabled. To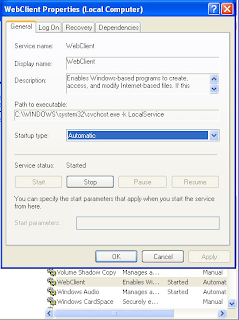 enable WebDAV on XP, open the Services console under Administrative Tools and find the WebClient service and double-click on this service to open its Properties. Change the Startup Type to Automatic, then click the Start button to run the service. Now you can publish the site content to your web server.
Settings on the Server for WebDAV
The physical directory where the Virtual directory points to be given read/write/directory listing permissions.
To publish content with WebDAV, the following web permissions on the directory to be enabled.
1. Read - lets users read what has been published to the server
2. Write - lets users upload new content to the server and edit existing content on the server
3. Directory listing - lets users view a list of published files on the server so they can select the one they want to view or edit.
If the Access is going to be given for a particular user group, It has to have Read, Read & Execute, and List Folder Contents permission. These are necessary for WebDAV users to be able to write and modify content on the web server. There are also two additional special permissions that the Users group has Create Files / Write Data, Create Folders / Append Data. These permissions too are necessary for WebDAV publishing, so don’t change them.
Publishing content with WebDEV
Go to Internet Explorer’s Menu, File>Open
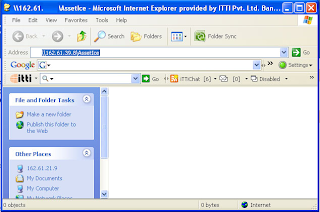
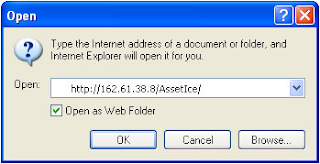 Check the ‘Open as Web‘ check box. Window will be opened with 0 Object displayed.
Now, drag and drop your Local files in this window, it reaches at the root of your Virtual Directory’s root on the remote server!. You can browse it as http://162.61.39.8/Assetice/NewFile.aspx
Why WebDEV and whats wrong with FTP?
The traditional method for uploading content to a web server is File Transfer Protocol (FTP), but using this approach has its disadvantages:
• Using FTP requires that you open additional ports on your perimeter firewall, and this can increase the attack surface of your network and make it more susceptible to penetration by attackers. This is obviously undesirable from the perspective of keeping your network secure.
• FTP has no file locking mechanism, so it’s possible for two users to upload different versions of the same file simultaneously causing one to be overwritten. This can mean lost time troubleshooting why an uploaded file is different from what you expect.
• The FTP approach means you have to edit your content locally on the client. In other words, to edit a page already on the web server you would have to download it to the client, edit it there, and then upload it again to the web server. This is a time-consuming and inefficient approach to managing content.
WebDAV offers the solution for all the above problem scenarios, It’s a protocol used for publishing and managing content to web servers. WebDAV is an extension of the HTTP/1.1 protocol described in RFCs 2518 and 3253. WebDAV overcomes the three issues described above as follows:
• WebDAV uses port 80, the same port used by HTTP for web access. So using WebDAV means you don’t have to open any extra ports on your firewall.
• WebDAV lets only one user modify a file at a time, while allowing multiple users to read it. This allows files to be locked while they are being edited, preventing unexpected changes from occurring.
• WebDAV lets you edit files on the server instead of needing to download them first to the client. Editing files remotely using WebDAV is as easy as if they were locally present, and the whole process is transparent to the content producer.
How to Install and Use WebDEV on your Server?
When we use Windows Server 2003 machine to the role of Application Server, it installs various IIS 6 components but WebDAV isn’t one of these components installed. This is different from the earlier Windows 2000 Server platform where installing IIS 5 automatically installed WebDAV as well. To install WebDAV on the IIS 6 machine, use Add or Remove Programs in Control Panel and run the Windows Components Wizard. You can see WebDAV under Application Server > Internet Information Services > World Wide Web Service > WebDAV Publishing. Check it and Install.
You need to enable it for IIS after the installation. To verify if enabled, check the WebDAV option under the Web Service Extensions node in IIS Manager. Open IIS (Start>Run>inetmgr) See Web Service Extensions at the left pane. You will be able to se WebDEV at the right pane, if you select the Wen\b Service WExtension from the left pane. Make sure that it is Allowed. Be noticed, when WebDAV extension (httpext.dll) is Allowed, it would be applicable for all websites on your server. IIS unfortunately does not let you configure WebDAV for each and every website separately.
What to be set at Client side?
To create and manage content for your website , WebDAV to be enabled on the client machines. Windows XP has a built-in WebDAV client that doesn’t need to be installed, only enabled. To
 enable WebDAV on XP, open the Services console under Administrative Tools and find the WebClient service and double-click on this service to open its Properties. Change the Startup Type to Automatic, then click the Start button to run the service. Now you can publish the site content to your web server.
Settings on the Server for WebDAV
The physical directory where the Virtual directory points to be given read/write/directory listing permissions.
To publish content with WebDAV, the following web permissions on the directory to be enabled.
1. Read - lets users read what has been published to the server
2. Write - lets users upload new content to the server and edit existing content on the server
3. Directory listing - lets users view a list of published files on the server so they can select the one they want to view or edit.
If the Access is going to be given for a particular user group, It has to have Read, Read & Execute, and List Folder Contents permission. These are necessary for WebDAV users to be able to write and modify content on the web server. There are also two additional special permissions that the Users group has Create Files / Write Data, Create Folders / Append Data. These permissions too are necessary for WebDAV publishing, so don’t change them.
Publishing content with WebDEV
Go to Internet Explorer’s Menu, File>Open
 Check the ‘Open as Web‘ check box. Window will be opened with 0 Object displayed.
Now, drag and drop your Local files in this window, it reaches at the root of your Virtual Directory’s root on the remote server!. You can browse it as http://162.61.39.8/Assetice/NewFile.aspx

Generic Handlers to display images from database in a gridview from database.
Generic Handler ; A ‘Generic’ way to find the solution.
Was fuming my head to fetch the logo image from SQL Server database (Not the URL, Image stored as the type image, in binary format). Plenty of try outs could lead me in to the solution.
ASP.Net 2.0 does not allow images(binary format) from the database and directly databind to a control in the page. There are some tricky things to get it done, Take a sneak peak.
Here is my Company Master Table
 Allow null I used as this field was an addition to the master table which has got references to the transactions. Hope you understood the significance of allowed null. Well, leave that topic, it doesn’t make any sense in this topic.
I had to deal with two presentation layer files for this scenario. One is the .aspx page where my grid view sits with data bound with all the company information, except the logo, and the other, an ASHX file to custom handle the request. Try binding the logo entity to the server side image control, its not gonna work out.
So bind all other fields of Company master to the grid’s item templates and see how the image can be displayed. Here comes the role of Generic Handler.
Generic Handlers are equivalent to custom handlers and they contain classes that fully implement IHttpHandler. All you need is to simply surf the Generic Handler (ASHX) files and they're compiled automatically just as ASPX file works.
Advantages of Generic Handlers
The advantage of using the generic handler is twofold. First, it's usually much more convenient to generate a simple handler than it is to create a whole new assembly to handle the request. Second, you don't need to run interference with either Web.Config or with IIS. That is, Web.Config and IIS already understand what to do about files with the extension of .ashx. Installing ASP.NET places those when mapping into IIS.
Limitations
However, ASHX files have the same limitations as ASPX and ASCX files in terms of their place in an ASP.NET project. Simple generic handlers go with the project. That is, for the handler to work, it must accompany the whole project. Alternatively, custom handlers deployed as separate assemblies may be deployed and shared among the enterprise as Global Assembly assemblies (that is, strongly named assemblies placed in the Global Assembly Cache).
Back to our problem; added an image control in the template field of the grid view where I had to load the Company Logo.Hope you know the way of creating a Generic Handler. If not follow these steps.
Right click on the Website Project and Add New item in the Solution Explorer of Visual Studio IDE.
 My Stored Procedure fetches the image field from Company Master for a particular Company ID. This ID had to be provided from the Grid View’s Item template as a Query String to the Generic Handler.

No big deal, accepted the query string and passed it to Stored Procedure and fetch the data as byte[]. Did a binary write of the fetched data. From the ASPX page, ie, my Master Dot Net Page,
public void ProcessRequest (HttpContext context) {
Was fuming my head to fetch the logo image from SQL Server database (Not the URL, Image stored as the type image, in binary format). Plenty of try outs could lead me in to the solution.
ASP.Net 2.0 does not allow images(binary format) from the database and directly databind to a control in the page. There are some tricky things to get it done, Take a sneak peak.
Here is my Company Master Table
I had to deal with two presentation layer files for this scenario. One is the .aspx page where my grid view sits with data bound with all the company information, except the logo, and the other, an ASHX file to custom handle the request. Try binding the logo entity to the server side image control, its not gonna work out.
So bind all other fields of Company master to the grid’s item templates and see how the image can be displayed. Here comes the role of Generic Handler.
Generic Handlers are equivalent to custom handlers and they contain classes that fully implement IHttpHandler. All you need is to simply surf the Generic Handler (ASHX) files and they're compiled automatically just as ASPX file works.
Advantages of Generic Handlers
The advantage of using the generic handler is twofold. First, it's usually much more convenient to generate a simple handler than it is to create a whole new assembly to handle the request. Second, you don't need to run interference with either Web.Config or with IIS. That is, Web.Config and IIS already understand what to do about files with the extension of .ashx. Installing ASP.NET places those when mapping into IIS.
Limitations
However, ASHX files have the same limitations as ASPX and ASCX files in terms of their place in an ASP.NET project. Simple generic handlers go with the project. That is, for the handler to work, it must accompany the whole project. Alternatively, custom handlers deployed as separate assemblies may be deployed and shared among the enterprise as Global Assembly assemblies (that is, strongly named assemblies placed in the Global Assembly Cache).
Back to our problem; added an image control in the template field of the grid view where I had to load the Company Logo.Hope you know the way of creating a Generic Handler. If not follow these steps.
Right click on the Website Project and Add New item in the Solution Explorer of Visual Studio IDE.
 My Stored Procedure fetches the image field from Company Master for a particular Company ID. This ID had to be provided from the Grid View’s Item template as a Query String to the Generic Handler.

No big deal, accepted the query string and passed it to Stored Procedure and fetch the data as byte[]. Did a binary write of the fetched data. From the ASPX page, ie, my Master Dot Net Page,
public void ProcessRequest (HttpContext context) {
SqlConnection con = new SqlConnection();
con.ConnectionString = ConfigurationManager.ConnectionStrings["MyConnString"].ConnectionString;
SqlCommand cmd = new SqlCommand();
cmd.CommandText = "select CH_CMP_LOGO from CH_CMP_INFO where CH_CMP_ID = @ID";
cmd.CommandType = System.Data.CommandType.Text;
cmd.Connection = con;
SqlParameter ImageID = new SqlParameter("@ID", System.Data.SqlDbType.Int);
ImageID.Value = context.Request.QueryString["ID"];
cmd.Parameters.Add(ImageID);
con.Open();
SqlDataReader dReader = cmd.ExecuteReader();
dReader.Read();
context.Response.BinaryWrite((byte[])dReader["CH_CMP_LOGO"]);
dReader.Close();
con.Close();
}
I could browse and view the company listing.
 Happy!
 Happy!
sorry, i forgot to tell about the data access layer specialty to fetch the image.
int logoImageIndex = reader.GetOrdinal("CH_CMP_LOGO");
if (!reader.IsDBNull(logoImageIndex))
{
companyListingEntity.LogoImage = new Byte[(reader.GetBytes(logoImageIndex, 0, null, 0, int.MaxValue))];
reader.GetBytes(logoImageIndex, 0, companyListingEntity.LogoImage, 0, companyListingEntity.LogoImage.Length);
}
Monday, August 10, 2009
Service Unavailable error message when you browse a MOSS / WSS site or Central Admin.
IIS must be the reason for this. Do an IIS reset and see. If the problem persists, Just check the farm administrators password which has been set on the Application Pool.
To see this, go to Application Pool of both your site and the Central Administration site and right click to see the properties. Go to Identity tab and see the account name.
Make sure that the password is latest. If your network policy is defined some password expiration policy, you must have changed the password of the farm admin's domain password. Some times this to be reset in the Application Pool also. Do it for all the application pools of the sites which are not running and saying 'Service Unavailable'.
Give the new password in the identity tab and reset the iis.
run>cmd> iisreset
Hope it works fine now.
Wednesday, August 5, 2009
What next? Yeah, I got JQuery in hand !
What next, if the server side controls are rendered in to pure html? Has developer all done with coding? Not at all, jQuery can do a million at the front end.
 Quite surprisingly, the client manager asked us to display the details of an internal order in a new table right after the selected row of the grid view by adding a new row in the grid view. What to do when the server side code has lost the control after the code has been rendered in to the browser? We went Google to come out of the trouble.
jQuery was the answer we found to relax a bit. The code snippets we found during our search made us wonder line by line. Hours of R&D brought us delight, could present it pretty decently up to the expectation.
Have a sneak peek here, this is the way we done it.
Added a button control in the item template of the Grid view. Attached a VB.Net Function in the Client Click event of the button, passing the Internal Order Number (PK) to it.

This VB Function triggers the Javascript Function defined in an external file. Passing Internal Order number and the current object Id. This Javascript method gets the parent object of the button, which is aelement with help of jQuery and the object with the help of TD object.
Checking the value of the button control for + ( ie in collapsed mode ) and if collapsed, calling a Web service which returns the Result set for a particular Internal Order Number.
Just see how handy jQuery is
function LoadSummaryDetails(internalOderno,btnID, myObj)
{
btn=$('#'+btnID);
var btnVal=$(btn).attr('value');
td=$('#'+btnID).parent();
tr=$(td).parent();
if(btnVal == '+')
{
InternalOrder.InternalOrderXmlData.GenerateChildSummaryDetails(internalOderno,GridSucceedCallback);
}
else
{
$(btn).attr('value','+');
$(btn).attr('class','Expand');
var nextRow= $(tr).next();
$(nextRow).remove();
}
return false
}
Web Service method returns a result set as a string object with the help of a string builder object.
The Callback function associated with the web service call does the following steps
1. Assigns the value ‘-‘ to the grid’s button ( To ‘Expanded’ mode)
2. Setting the CSS class for the button.
3. Creating a newRow object and adding the result set returned by the Web service to it.
4. Adding the row after the current row.
function GridSucceedCallback(result,eventAgrs)
{
$(btn).attr('value','-');
$(btn).attr('class','Collapse');
var newRow = $("
$(newRow).append(" "+result+" ");
$(tr).after(newRow);
}
See the else block of the LoadSummaryDetails() function.
$(btn).attr('value','+');
$(btn).attr('class','Expand');
var nextRow= $(tr).next();
$(nextRow).remove();
On Click of ‘Collapse‘ button,
1. Set the value back to ‘+’ ( to ‘Collapsed’ mode)
2. Changing the css style
3. Getting the next row of the current row object where the Detials have been added.
4. Removing the row.
 Quite surprisingly, the client manager asked us to display the details of an internal order in a new table right after the selected row of the grid view by adding a new row in the grid view. What to do when the server side code has lost the control after the code has been rendered in to the browser? We went Google to come out of the trouble.
jQuery was the answer we found to relax a bit. The code snippets we found during our search made us wonder line by line. Hours of R&D brought us delight, could present it pretty decently up to the expectation.
Have a sneak peek here, this is the way we done it.
Added a button control in the item template of the Grid view. Attached a VB.Net Function in the Client Click event of the button, passing the Internal Order Number (PK) to it.

This VB Function triggers the Javascript Function defined in an external file. Passing Internal Order number and the current object Id. This Javascript method gets the parent object of the button, which is a
Checking the value of the button control for + ( ie in collapsed mode ) and if collapsed, calling a Web service which returns the Result set for a particular Internal Order Number.
Just see how handy jQuery is
function LoadSummaryDetails(internalOderno,btnID, myObj)
{
btn=$('#'+btnID);
var btnVal=$(btn).attr('value');
td=$('#'+btnID).parent();
tr=$(td).parent();
if(btnVal == '+')
{
InternalOrder.InternalOrderXmlData.GenerateChildSummaryDetails(internalOderno,GridSucceedCallback);
}
else
{
$(btn).attr('value','+');
$(btn).attr('class','Expand');
var nextRow= $(tr).next();
$(nextRow).remove();
}
return false
}
Web Service method returns a result set as a string object with the help of a string builder object.
The Callback function associated with the web service call does the following steps
1. Assigns the value ‘-‘ to the grid’s button ( To ‘Expanded’ mode)
2. Setting the CSS class for the button.
3. Creating a newRow object and adding the result set returned by the Web service to it.
4. Adding the row after the current row.
function GridSucceedCallback(result,eventAgrs)
{
$(btn).attr('value','-');
$(btn).attr('class','Collapse');
var newRow = $("
$(newRow).append("
$(tr).after(newRow);
}
See the else block of the LoadSummaryDetails() function.
$(btn).attr('value','+');
$(btn).attr('class','Expand');
var nextRow= $(tr).next();
$(nextRow).remove();
On Click of ‘Collapse‘ button,
1. Set the value back to ‘+’ ( to ‘Collapsed’ mode)
2. Changing the css style
3. Getting the next row of the current row object where the Detials have been added.
4. Removing the row.
How to know the version of the SharePoint you are using
Go to Control Panel -> Add and Remove Programs.
OR, Go to (Windows) Start>Run>
Type appwiz.cpl
OR, Go to (Windows) Start>Run>
Type appwiz.cpl

Select the product (sharepoint server) and then click: Click here for support.
Or: Under Tasks, Click "View Installed Updates"
Doesn't it answer your querry? :) Window must have popped up and said about your current SharePoint version.
Subscribe to:
Posts (Atom)